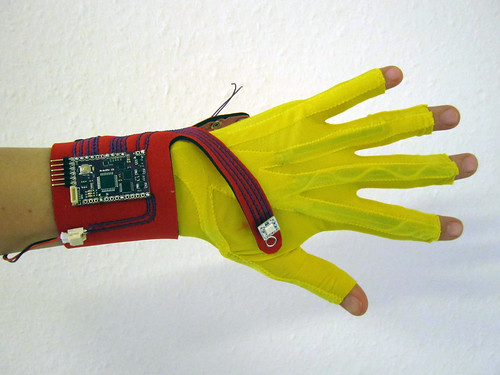
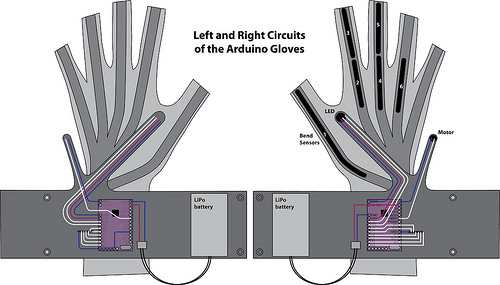
DIY: Make Yourself a Pair of Gloves
This page is currently under construction!
Materials
Since many of the electronic parts we use can be ordered from Sparkfun (USA) we have put together a wishlist on their website, but you can also source the parts from various other distributors!
Sparkfun wishlist >> https://www.sparkfun.com/wish_lists/31900
Materials Summary
2 x ArduIMUs
2 x BlueTooth or FTDI cables
2 x LiPo Batteries (if wireless)
2 x LiPo Chargers (if wireless)
2 x JST sockets for battery power connection (if wireless)
10 x Bend Sensors (or more if you like)
2 x I2C RGB LED module
2 x vibration motor
1 x Sugru
20 x male and female metal snaps
1/2 meter stretch fabric
1/2 meter 2mm thick neoprene with fabric fused to either side
1 spool of thin flexible wire
20 x 20cm fusible interfacing
20 x 20cm non-stretch fabric
1 spool sewing thread
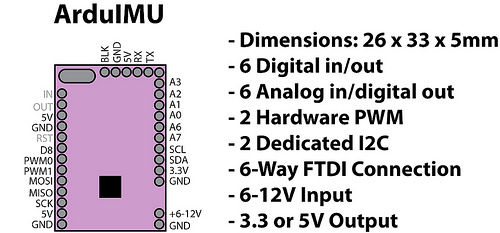
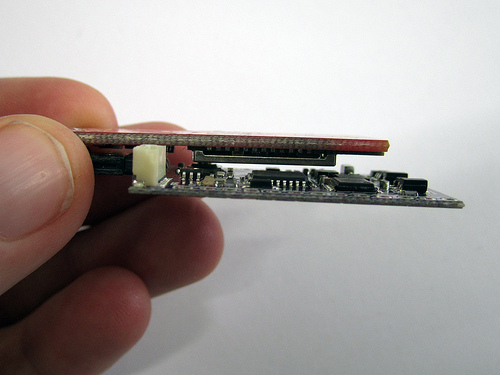
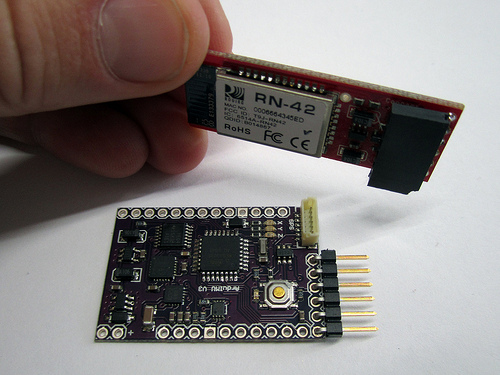
ArduIMU
So far I have only found the ArduIMU for sale in the USA from either Sparkfun or DIYDrones, though you will also have to pay shipping and customs if ordering outside USA. On Ebay I found one distributor based in UK.
DIY Drones (50USD) >> http://store.diydrones.com/ArduIMU_V3_p/kt-arduimu-30.htm
Sparkfun (70USD) >> https://www.sparkfun.com/products/11055
Ebay UK (95GBP) >> http://www.ebay.de/itm/SparkFun-DIYDrones-ArduIMU-V3-/130823640170?pt=UK_Computing_Other_Computing_Networking&hash=item1e75b2546a
Bluetooth or Wired
Bluetooth Mate Silver
Sparkfun (USA) >> https://www.sparkfun.com/products/10393?
TinkerSoup (DE) >> http://www.tinkersoup.de/product_info.php?products_id=497
Deal Extreme (China) >> http://dx.com/s/104299
FTDI Cacble (all-in-one) >> https://www.sparkfun.com/products/9718
FTDI breakout board (USB Mini cable) >> https://www.sparkfun.com/products/9716
JST Socket for Battery Power
Tinkersoup (DE) >> http://www.tinkersoup.de/product_info.php?products_id=582
Sparkfun (USA) >> https://www.sparkfun.com/products/8612
LiPo Battery
850mAH
Sparkfun >> https://www.sparkfun.com/products/341
TinkerSoup >> http://www.tinkersoup.de/product_info.php?products_id=368
LiPo Battery Charger
LiPo charger >> https://www.sparkfun.com/products/10401
Tinkersoup (DE) >> http://www.tinkersoup.de/product_info.php?products_id=535
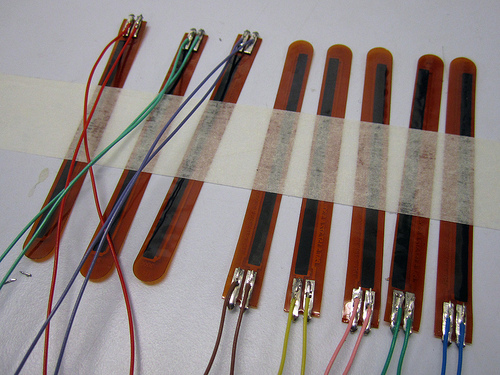
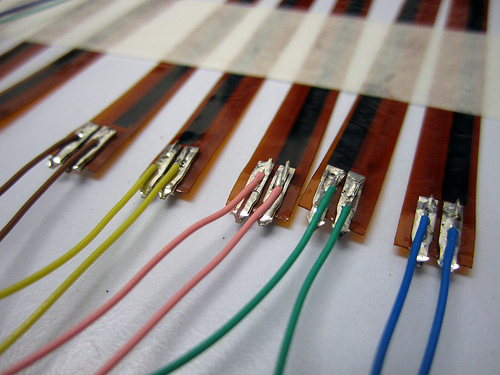
Bend Sensors
In the current gloves we use 3 inch bend sensors from Flexpoint and have found them to be the most robust and reliable. Have tried different versions (laminated and not laminated and so far have not noticed differences, so really it is up to you which ones to use). Here is a list to FlexPoint 2013 pricing.
FlexPoint Bend Sensors (USA) >> http://www.flexpoint.com/companyInfo/bendSensor.htm
Stickytape bend sensors >> http://www.instructables.com/id/Stickytape-Sensors/
RGB LED (I2C)
Sparkfun (i2C RGB LED module) >> https://www.sparkfun.com/products/8579
Sparkfun (RGB LED) >> https://www.sparkfun.com/products/10866
Vibration Motor
UK >> http://www.precisionmicrodrives.com/
Sparkfun >> https://www.sparkfun.com/products/8449
Sugru
Sugru (UK) >> https://sugru.com/
Modulor (DE) >> http://www.modulor.de/shop/oxid.php/sid/923c4af23b123d3d920d38446e647b31/cl/details/cnid/-/anid/315180
Wire
Here is a post about thin flexible wire sources.
LIFY 0,05mm^2, 25m in 9 different colours
Conrad (DE, EU) >> http://www.conrad.at/ce/de/product/606404/LiFY-Hochflexible-Decoder-Litze-1-x-05-mm-Gelb-50-m-Conrad
Stretch Fabrics
The fabric part of the gloves is best made from a stretch material that stretches equally in all directions and keeps it’s shape well. Nylon spandex, lycra and stretch jersey have these properties, but depending on the exact fabric and quality you get, it can work well or not. If you are lucky you will find a local fabric shop that stocks stretch materials in a variety of qualities and colours for you to choose from. But otherwise you will have to resort to online shops which can be tricky when you can touch and feel the fabric in your own hands. So try emailing these shops for a selection of samples first, before placing an order.
Powermesh fabrics are robust, stretchy and transparent if you want to be able to show off the tech inside (though it does seem to wear at the seams). This is the power mesh that I ordered for a recent pair of gloves, but it looks very blue, not gray:
I’m working on sourcing an online source for the perfect glove fabrics, but have not found the perfect selection yet.
>> http://www.tissufabrics.co.uk/fabric-store/grey-power-mesh-net-4-way-stretch-fabric.html
Tissu Fabrics (UK) >> http://www.tissufabrics.co.uk/fabric-store/
>> Welt der Stoffe (Berlin, Germany)
>> Hüco Stoffe (Berlin, Germany)
Neoprene
HS quality, 2mm thick, polyester nylon fused to either side, colours of choice
SedoChemicals (Berlin) >> http://sedochemicals.de/
Foam Order (USA) >>
Metal Snaps
7mm diameter matal snaps (you can also use different size!).
Because Velcro damages the fabrics, and also because the conductivity of metal snaps can be used to make electrical connections, we use
Plug and Wear (Italy) >> http://www.plugandwear.com/default.asp?mod=product&cat_id=95,100&product_id=166
Fusible Interfacing
You only need a small piece of this in combination with the non-stretch fabric (see bellow) to use on the back of the wrist-band circuit as strain-relief. This is seomthing you will find at most local fabric stores. It is sold under various names such as: Interweb, Bondaweb, Fusible, Interfacing, “iron-on“, Fusible web… basically it is a double-sided fabric glue that becomes sticky when heated up with an iron. Because it is sticky on both sides it comes with a way paper on one side so that you can first fuse it to one piece of fabric, then peel off the paper backing, cut out your shape and fuse this to the other piece of fabric. In our case the fusible goes between the non-stretch fabric and the neoprene.
Joann (USA) >> http://www.joann.com/heat-n-bond-ultra-hold-iron-on-adhesive-17-w-x-1yd/prd2979/
Amazon (DE, EU) >> http://www.amazon.de/USA-Produkt-Heatn-Iron-On-Adhesive-17/dp/B000Y0083K/ref=sr_1_8?ie=UTF8&qid=1359914187&sr=8-8
Non-Stretch Fabric
You only need a small piece of this in combination with the fusible interfacing (see previous) to use on the back of the wrist-band circuit as strain-relief. You will definitely find some sort of non-stretch fabric in a local fabric shop, or even ask a friend or use an old piece of clothing.
Thread
Thread is something you can definitely get at a local fabric store. You want thread that can run in your sewing machine. You can pick the colours to match your fabric. When sewing the wires to the neoprene you can either pick a colour that matches the wire isolation to make the stitches less apparent, or pick a colour that will make them stand out.
Tools
Good Scissors
Fiskars sell a good selection >>
Fabric Marker
Non-permanent >> http://www.modulor.de/shop/oxid.php/sid/f6993398c20e7c2d73191a532f1f8986/cl/details/cnid/-/anid/300641
Sewing Machine and Sewing Supplies
Because for this project you will be sewing stretch fabrics and thick neoprene not every sewing machine will work. The best way to know, is really just to try. Make sure you are using the right needle (I have found that jersey needles work well for both the stretch fabrics and the neoprene).
If you don’t have a sewing machine of your own, the Naehinstitut in Berlin has a great setup and you pay 8Euro/hour to use any of the machines they have, and a little bit more if you need to professional help cutting patterns and using the machines.
Naehinstitut (Berlin) >> http://www.naehinstitut.de/
Iron and Board
You will find these at a local home appliance store. But probably you can also use one that you already have or borrow one from next door.
Snap Press
You can get snaps and snap presses locally, but normally they are for bigger diameter snaps. Plug and wear sells both 7mm snap presses and snaps.
Plug and Wear (Italy) >> http://www.plugandwear.com/default.asp?mod=product&cat_id=95,100&product_id=161
Soldering Station
I like the brand Weller.
Conrad (DE) >> http://www.conrad.de
Wire Clippers and Strippers
Sparkfun (USA) >> https://www.sparkfun.com/products/8696
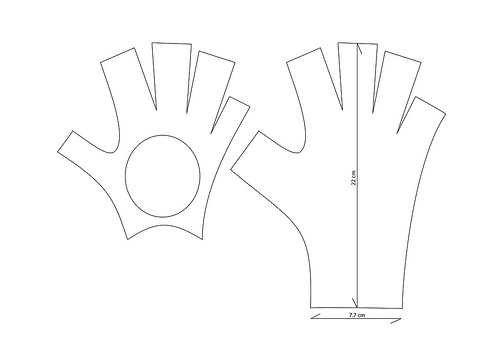
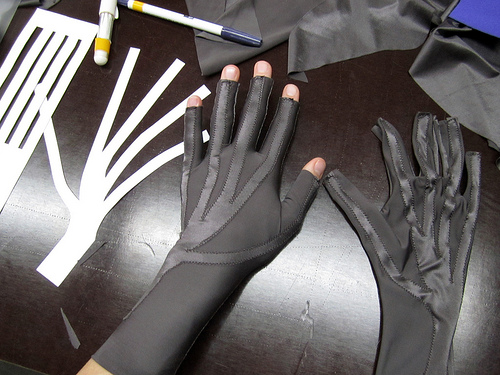
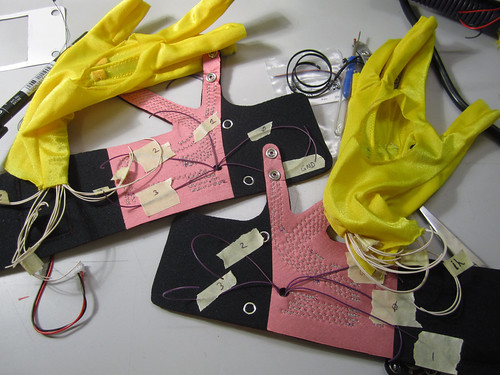
Step 1: Sewing The Gloves
(Click on the illustration bellow for the original size)
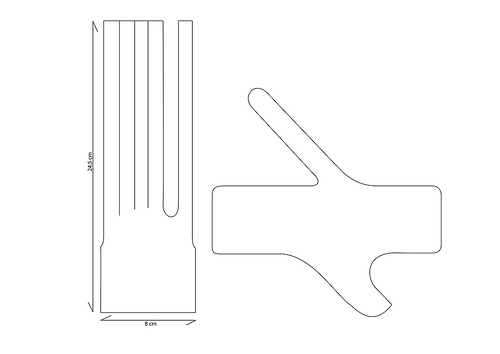
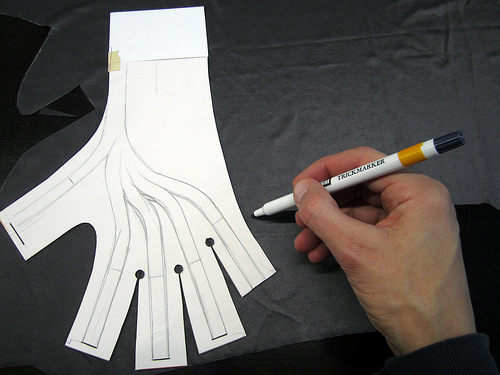
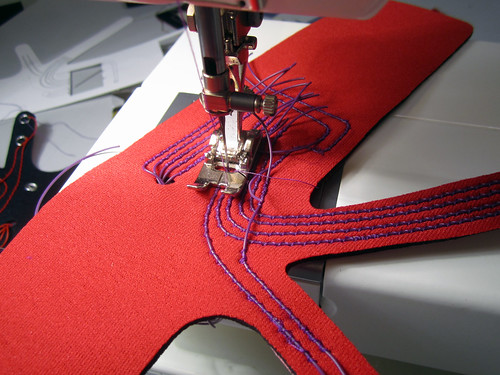
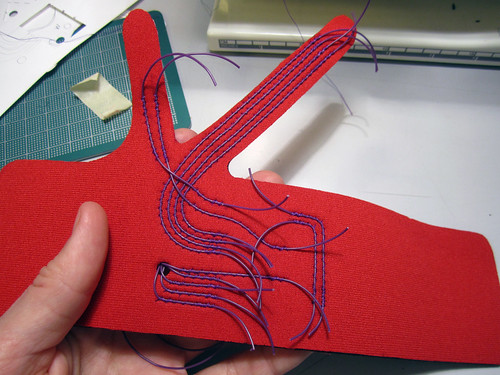
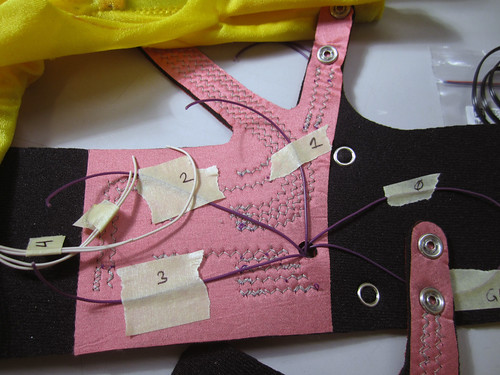
Step 2: Sewing the Wristband Circuit
Before sewing to the neoprene you first want to fuse some non-stretch fabric to the back of the neoprene in the area where you will sew the circuit. This is to create a strain-relief, so that when the neoprene stretches it does not pull at the wires and the solder joints.
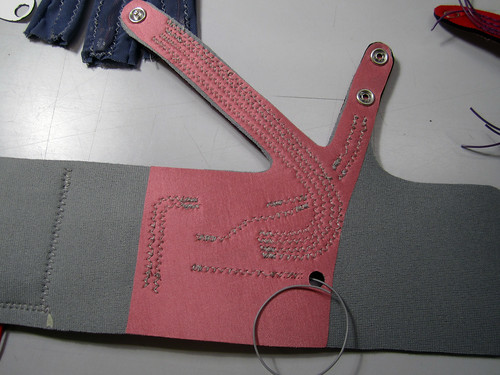
(Click on the illustration bellow for the original size)
Step X: Adding the Snaps
Step X: Making the Solder Connections
Step X: Preparing the Bend Sensors
Step X: Inserting and Fixing the Bend Sensors
Step X: Wiring Bend Sensors to ArduIMU
Step X: Wireless Connection
Pair with Bluetooth Device
Pairing Bluetooth device on Mac >> http://www.rioleo.org/setting-up-the-arduino-pro-mini-and-bluetooth-mate-on-mac.php
Pairing Bluetooth device on Windows >> http://jondontdoit.blogspot.com/2011/11/bluetooth-mate-tutorial.html
Steps:
- power your circuit and the light on your Bluetooth modem should blink red
- open the Bluetooth preferences of your computer and opt to pair with a new Bluetooth device by pressing the “+” at the bottom of the Bluetooth device list
- the circuit should show up as a FireFly Bluetooth device with an address similar to this: FireFly-A229
- press continue to begin pairing process
- when the attempt to pair with the device fails, opt to connect with pass code by pressing the Passcode Options button at the bottom left of the window
- type “1234″, which is the generic pass code
- once successfully paired the light on your BlueSmirf Modem should turn a steady green
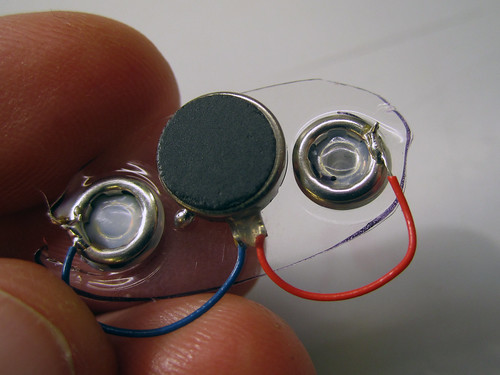
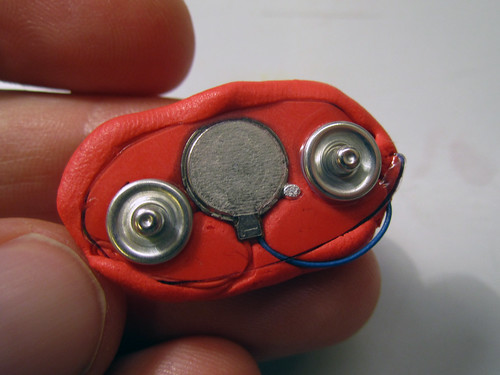
Step X: Making Vibration Motor Modules
Use some plastic to space the snaps apart the right distance. Mount the vibration motor between the snaps (on the back side) so that the casing of the vibration motor is not touching either metal snap! Solder the leads of the vibration motor to the back sides of the snaps. Use Sugru (or you can also use hot glue or Shapelock) to cover the vibration motor and the front side of the plastic spacer, so that only the front sides of the snaps are exposed.
Step X: Finished?